Yoga 15. Photo: Fiona Peters
The IT band is fraught with controversy. Ok, that may be over-egging the pudding a little. It’s probably more accurate to stay that the IT band is fairly controversial amongst health and fitness professionals. Should we stretch it? Can we stretch it? Is it a muscle? A tendon? Connective tissue? Are we going to have to talk about fascia again?
What doesn’t seem to be in question is that, in athletes, the IT band is commonly tight, sometimes painful, and is generally involved in muscular imbalances that can cause more serious chronic conditions.
So, what exactly is the IT band?
The IT or iliotibial band is a thick band of connective tissue that runs along the outside of the thigh, from the hip to just below the knee. At the hip, it originates from the gluteus maximus (buttock) and tensor fasciae lata (a small muscle on the outside of the hip. It acts like a spring when you walk, run, jump and ride your bike, storing and releasing elastic energy. It also helps to stabilize the hip and knee.
How does it get tight?
There are two primary reasons the IT band becomes tight—overuse and compensation, resulting from muscular imbalances.
1. Overuse without release.
As a key player in the stabilization of both the hip and the knee, the IT band is working constantly when you’re walking, running or pedaling a bike. Over time, this can lead to tightness, especially if your knee or hip alignment is off.
2. Compensation.
Tight muscles in the surrounding area can pull the IT band out of alignment, causing tension in the band itself. Some of the main culprits are the:
-Piriformis
-Tensor fasciae lata
-Psoas
-Quads
-Glutes (often both weak and tight)
-Calves
What are the consequences?
As everything in the body is connected, a tight IT band is associated with conditions ranging from:
-Iliotibial band syndrome—inflammation of the outer knee caused by irritation of the iliotibial band.
-Tendonitis in the knee and/or Achilles tendon.
-Patellofemoral syndrome (cyclist’s knee).
-Pain in the outer knee, behind the knee, in the outer calf, hip or thigh.
Where does the controversy come in?
As the IT band is not a muscle—and is denser and less elastic like a tendon—it is not receptive to stretching in the same way. We can, however, stretch the muscles it connects to. This will help relieve some of the pressure and bring it back into a more favorable alignment.
A great style of yoga for this issue is yin, in which we typically hold poses for three minutes or more. This allows you to get a more intense release than you would with shorter holds. It is also deeply relaxing, which can help to relieve overall muscle tension.
Despite its pace, yin is not a mild practice and can pack quite a punch, so please be careful. You need to be particularly tuned into the difference between sensations of discomfort and those of pain. No pain no gain doesn’t fly in yoga.
If you do have a more serious IT band issue, please check first with your doctor or physical therapist that you have the all clear to perform these poses safely.
1-hour yin sequence
Find a quiet place, put your phone on airplane mode, and commit to an hour of serious relaxation. You may find a block, strap and some cushions make your session more comfortable.
1. Easy Seat (2 minutes)
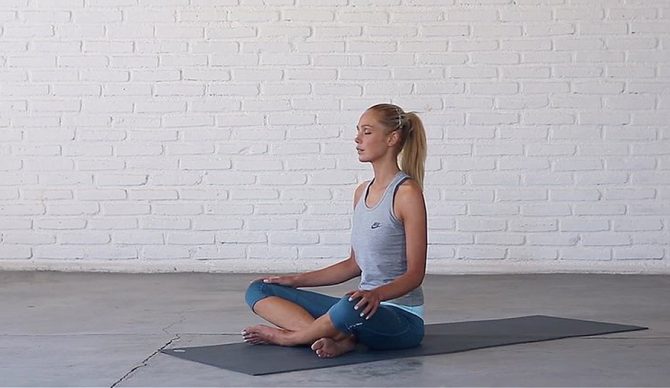
Photo: Fiona Peters
Begin in a comfortable cross-legged seat with your hands resting in your lap and your eyes closed. If you find this position uncomfortable or have difficulty keeping your back straight, you can sit on the edge of a cushion to raise your hips up higher than your knees.
Seal your lips and take a few deep breaths in and out through your nose. Allow your belly and chest to expand on the inhale, and contract on the exhale. Try to keep your mind on the movement of your body as you breathe for two minutes.
2. Wind-Relieving (3 minutes)

Photo: Fiona Peters
Come down onto your back for Wind-Relieving pose, a gentle hip opener and glute stretch. Bring your right leg flat to the mat and hug your left knee into your chest. Slow down your breath and completely relax for three minutes.
Repeat on the other side. Bring both feet flat to the mat.
3. Dead Pigeon (3 minutes)

Photo: Fiona Peters
Next, we’ll come into a deeper glute and hamstring stretch. Cross your right ankle over your left knee, thread your right hand through the triangle between your legs and hold the back of your left thigh with both hands. Gently pull your left leg in towards you and stay here for three minutes. You may be able to wrap your hands around your shin to increase the stretch.
Repeat on the other side. Hug your knees to your chest.
4. Happy Baby (3 minutes)
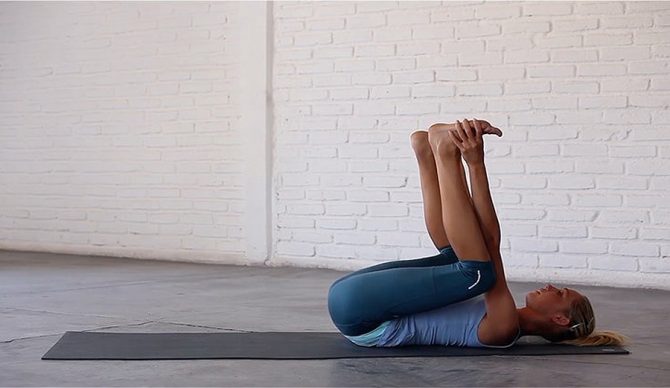
Photo: Fiona Peters
Release the pose for Happy Baby—a groin and hamstring stretch. Keep your feet together, open your knees and stretch your hands through to take hold of the outsides of your feet. Bring your feet out over your knees and gently pull them down towards you. If you can’t reach your feet, you can hold onto your ankles or shins. Flex your feet and stay here for two minutes, rocking gently from side to side.
Release the pose and hug your knees to your chest.
5. Reclining Hand-To-Big-Toe (4 minutes)
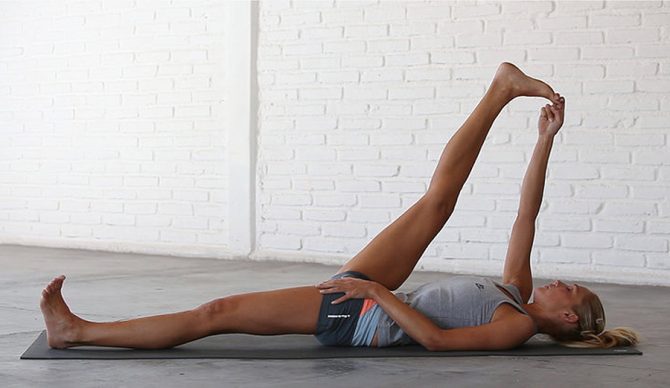
Photo: Fiona Peters
Reclining Hand-To-Big-Toe pose is a deep hamstring stretch. You’ll get the most leverage if you use a strap or belt.
Bring your right knee into your chest and straighten your left leg to the mat. Loop the strap around the ball of your right foot and press through your heel to straighten your leg up to the sky. You can bend your left leg and bring your left foot flat to the mat if this helps you to keep your hips level. Relax your elbows by your sides. Press up against the strap with the ball of your foot and hold for four minutes.
Repeat on the other side. Bring both feet flat to the mat.
6. Knee-Down Twist (3 minutes)

Photo: Fiona Peters
Let’s move into our first IT band stretch—Knee-Down Twist. Straighten your left leg up to the sky and press through your heel. Cross your left ankle over your right knee and flex your left foot. Drop the inside of your right ankle to the mat and gently lower your right knee down with the left foot still in place. Look to the right and stay here for 3 minutes—twisting from the base of your spine.
Come back to center and switch sides. Hug your knees to your chest.
7. Yogi Squat (2 minutes)
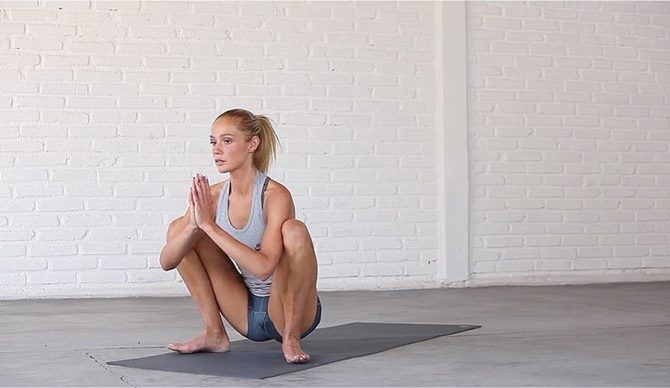
Photo: Fiona Peters
Rock and roll your way up to seated for Yogi Squat. Bring your feet out wider than your hips and point your toes to the top corners of your mat. Nestle your upper body in between your thighs and touch your palms together at your chest. You can stay up on the balls of your feet if your heels don’t come all the way down. Stay here for two minutes.
Sit back, bring your legs out in front of you, place your hands on the floor behind you and shake out your legs. Come forward onto all fours to set up for our Lizard series.
8. Half Twisted Lizard (3 minutes)

Photo: Fiona Peters
Step your left foot in between your hands, slide your right knee back and release your back foot. Walk your left foot out to the edge of the mat and pick up your right foot with your left hand. Draw your left shoulder back and look up to the sky. Drop your hips and gently pull your back foot in towards you to deepen the stretch in your right quad. Stay here for three minutes.
Release the pose, walk your left foot in and switch sides. Come back up on all fours.
9. Lizard (3 minutes)

Photo: Fiona Peters
Step your left foot in between your hands again, slide your right knee back and release your back foot. Bring your left hand inside your front foot and walk your front foot out to the edge of your mat. You can stay up on your hands or drop down onto your forearms and interlace your fingers. Hold the pose for three minutes.
Release the pose, walk your left foot back in and switch sides. Come back up on all fours.
10. Pigeon (5 minutes)

Photo: Fiona Peters
For our last pose and deepest glute stretch, bring your right knee forward and place it behind your right wrist. Position your right foot under your left hip. Release your back foot and slide it back. If your hips are not level, you can support your right hip on a cushion. Inhale, press into your palms to lengthen your spine. Exhale, fold forward, cross your arms and rest your forehead on the mat. Stay here for 5 minutes—feeling the stretch in your right outer hips and glute.
Come back up to all fours and switch sides.
11. Final Resting (5 minutes)
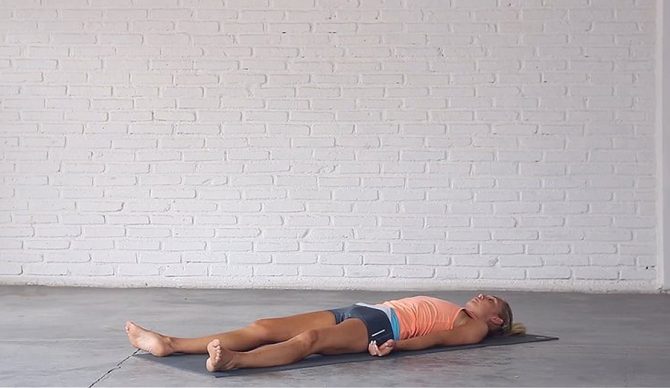
Lie down on your back for 5 minutes of integration and meditation. Let your feet come as wide as the mat and fall open. Relax your arms, palms facing up and tuck your shoulder blades underneath you. Close your eyes.
Let all the muscles in your body soften and relax. Bring your attention to the gentle rising and falling of your breath. To the effortless expansion and contraction of your belly and ribcage. Try to keep your focus on the sensations of your breath in your body as you allow the effects of the sequence to assimilate.
Note: You can find more from the author at Yoga15 here.
